Introduction: What is motion warping?
Motion Warping allows our characters to modify the root motion of their animations to reach where they need to reach.
In this article you will learn how we can apply the concepts of Unreal Engine 5 motion warping to create an “attack magnet” system similar to games like Kingdom Hearts.
We will be using Blueprint Programming to do this, but anything that we do here is also applicable to C++.
So if you are ready to learn, let’s go!
Setting up the Motion Warping in our Characters
Activating the plugin
The first thing we need to do for motion warping to even exist in our project is to enable the motion warping plugin.
To do so you can go into the Unreal top bar and then go to:
Edit -> Plugins
A new window will appear and in there you can scroll your way through tons of plugins until you find the one you are looking for or simply search it in the search bar.
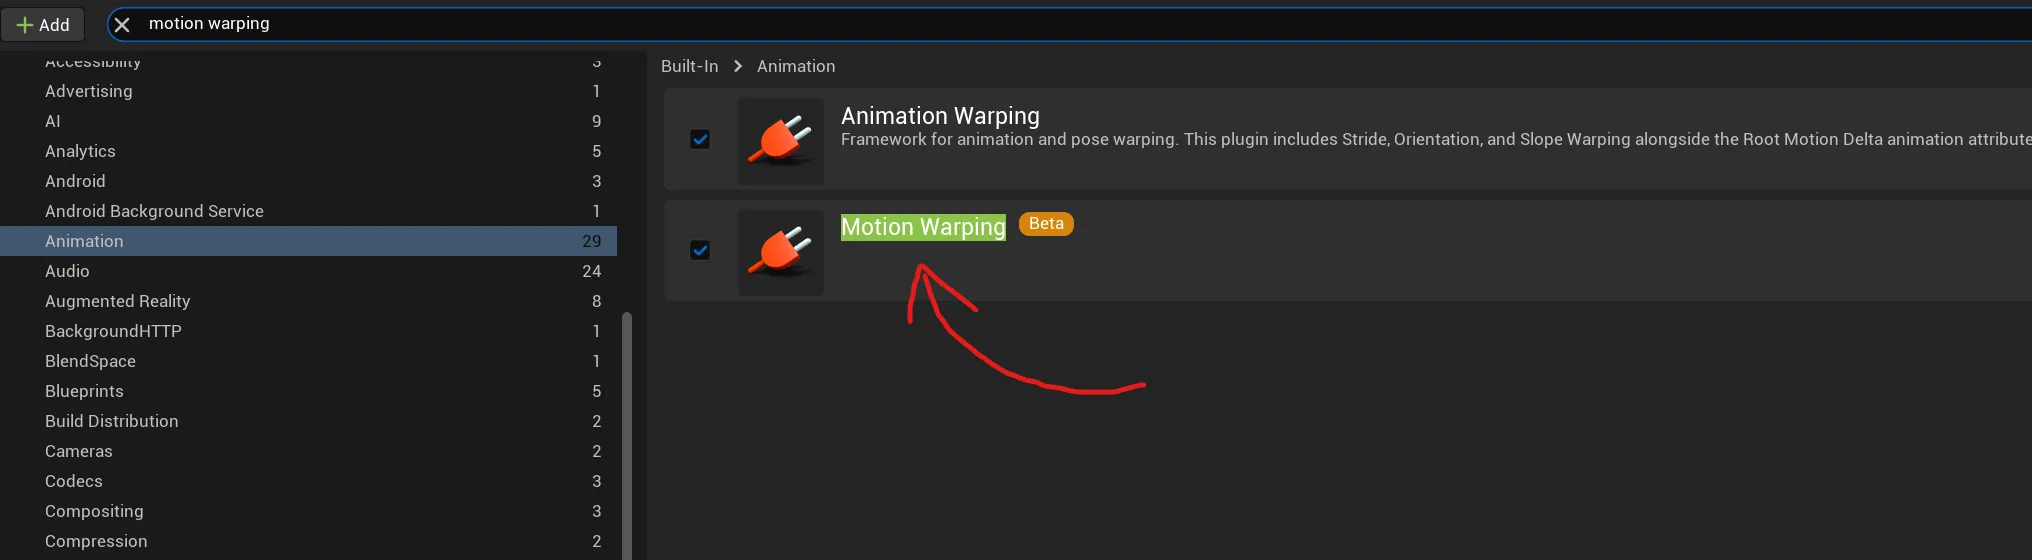
So we are going to search for the plugin and once we find it we are going to enable the Motion Warping plugin by clicking its checkbox.
After doing this Unreal will prompt you to restart for the changes to take effect, so do that and you are ready to use the plugin.
Adding the component to our character
Now that the plugin is active only one thing remains in the setup.
We will go to our character Blueprint and add the Motion Warping component.
To do so, click on the Add button on the left panel, the one with the green plus sign ( 1. )
And then search for the component by name, or scroll until you find it, up to you. ( 2. )
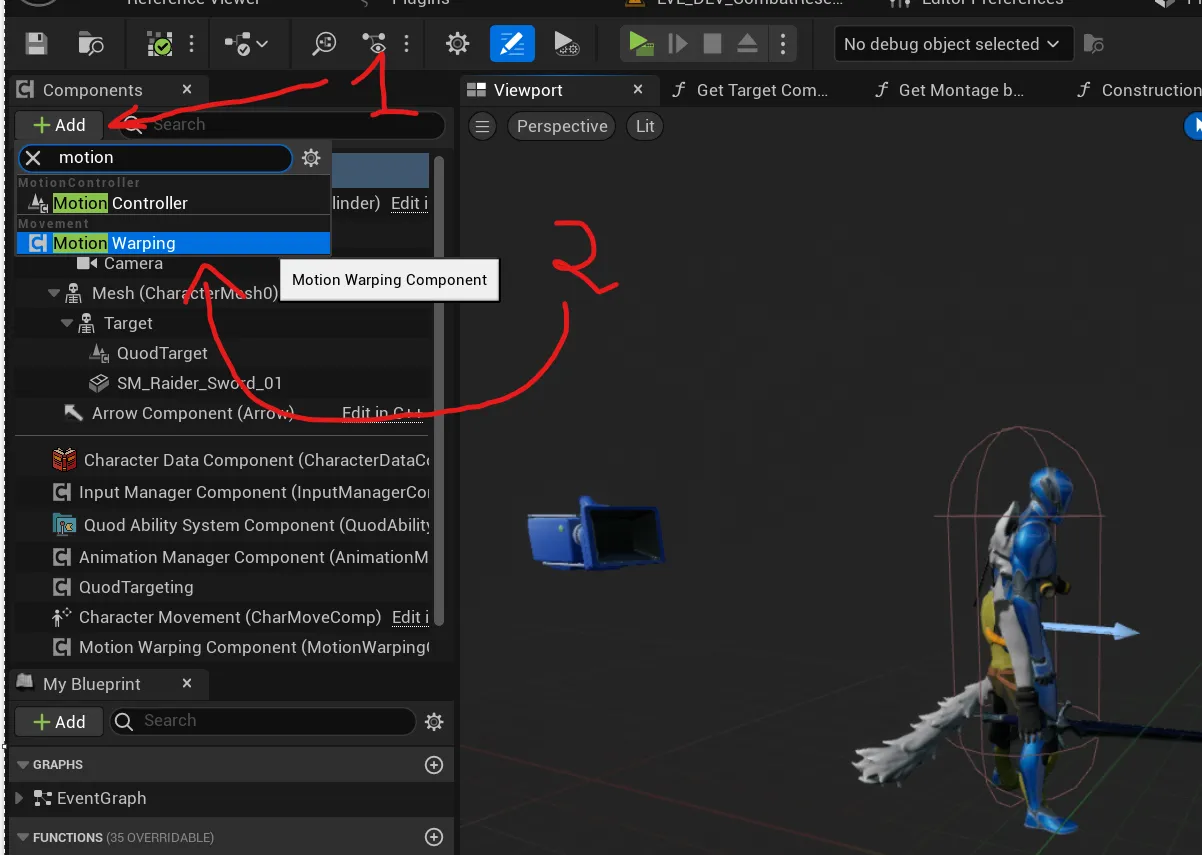
Once you have done this your character now has the Motion Warping component and will be able to use the system to do cool things.
How to use the Motion Warping system in Blueprint
The system has tons of things that can be done with Blueprint programming, we can create new Motion Warp types, or we can set targets in a variety of ways, but for now we will see 3 main functions of the component that will be useful to us, with these three you should be able to do almost anything you need.
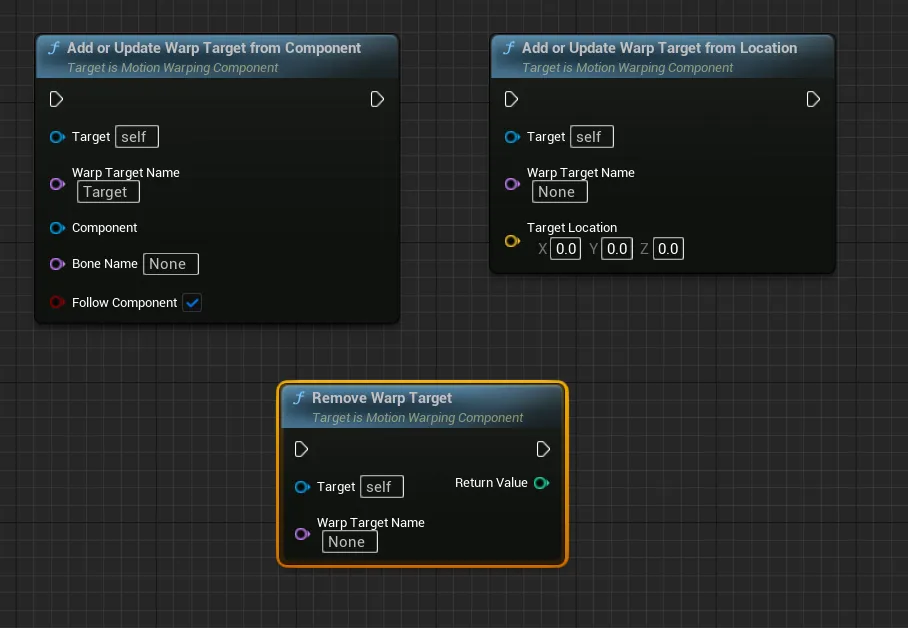
These main functions are:
- Add or Update Warp Target from Location: Sets the Target of the motion warping to the specified location
- Add or Update Warp Target from Component: Sets the Target of the motion warping to the specified component, with the options to track a bone, and to track it over time
- Remove Warp Target: Remove previously set Target data
The way that motion warping works is that you will set a Target with a name, and then on the animations, the notifies will look for that target to perform the warping.
If there is no target info they will do nothing.
Using motion warping in our Attack Ability
In this article I will be using a simple attack Gameplay ability, but anything that we do here is applicable as well to simply connecting the code to your character blueprint with a “Left Mouse Button” input, or whatever event you want.
If you do that, you can replace anywhere you see “Get Avatar Actor from Actor Info” with “self” or “Get Player Character”.
Implementing the attack
So, the way this is going to work is that we are going to do the following.
- Look around our character for potential targets
- If we find targets, iterate them and keep the closest one
- Set the motion warping target to the closest target if we found it
- Play the attack montage
Sphere Trace to look for targets
So first, when we receive the input to attack we do a multi sphere trace for objects. We want to trace objects of type Pawn, to only get characters and we want to add ourselves to the list of actors to ignore. ( We don’t want to be attacking ourselves )
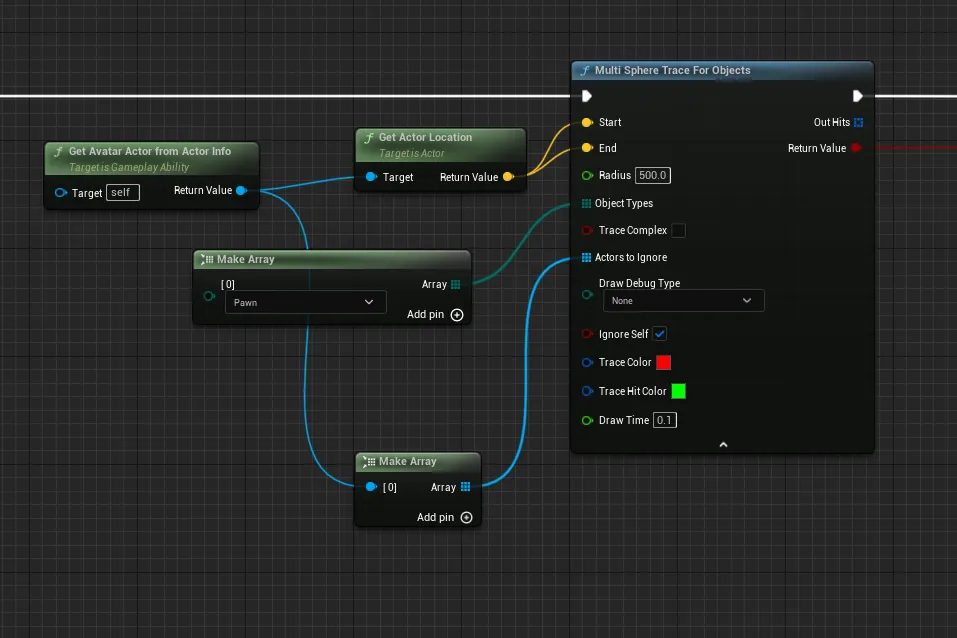
For the sphere trace location we use the player character location and we use a multi sphere trace as we don’t want to only detect one actor, but be able to evaluate all actors in range.
For distance I put 5 meters ( Unreal units are in centimeters that is why in Radius it says 500 ) but this distance is going to depend on your game.
Checking if we detected something
Now we need to check if we actually hit something with the trace, you can do that by checking the boolean output of the trace function with a branch.
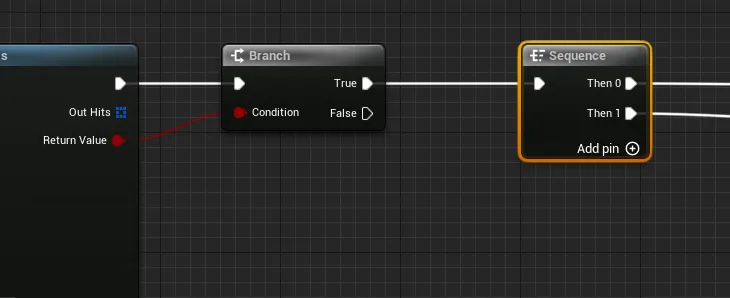
After that we are going to add a Sequence node to do two things ( this is not needed but helps keep the code organized )
Iterate through the results
The first thing we are going to do is search for the closest actor, so we initialize a variable to a big value ( there are better ways to do this, but for now this will work ) and then we iterate through all the hit results of the trace.
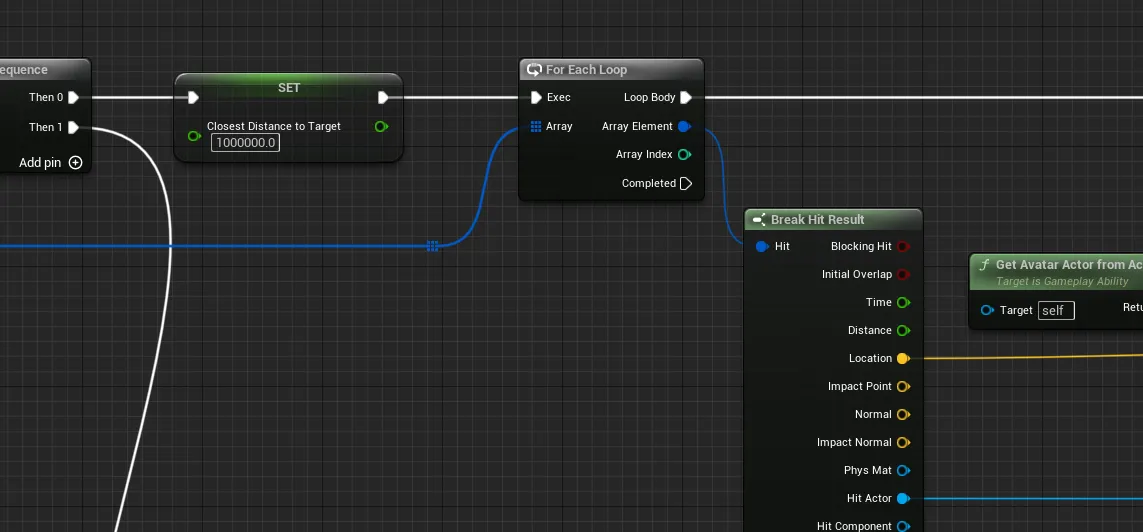
Compare result against saved values
For each result we check if the distance to the player is lower than our smallest saved distance, and if that is the case, we update the closest distance and save that actor in another variable.
We can get the actor directly from the information stored in the hit result.
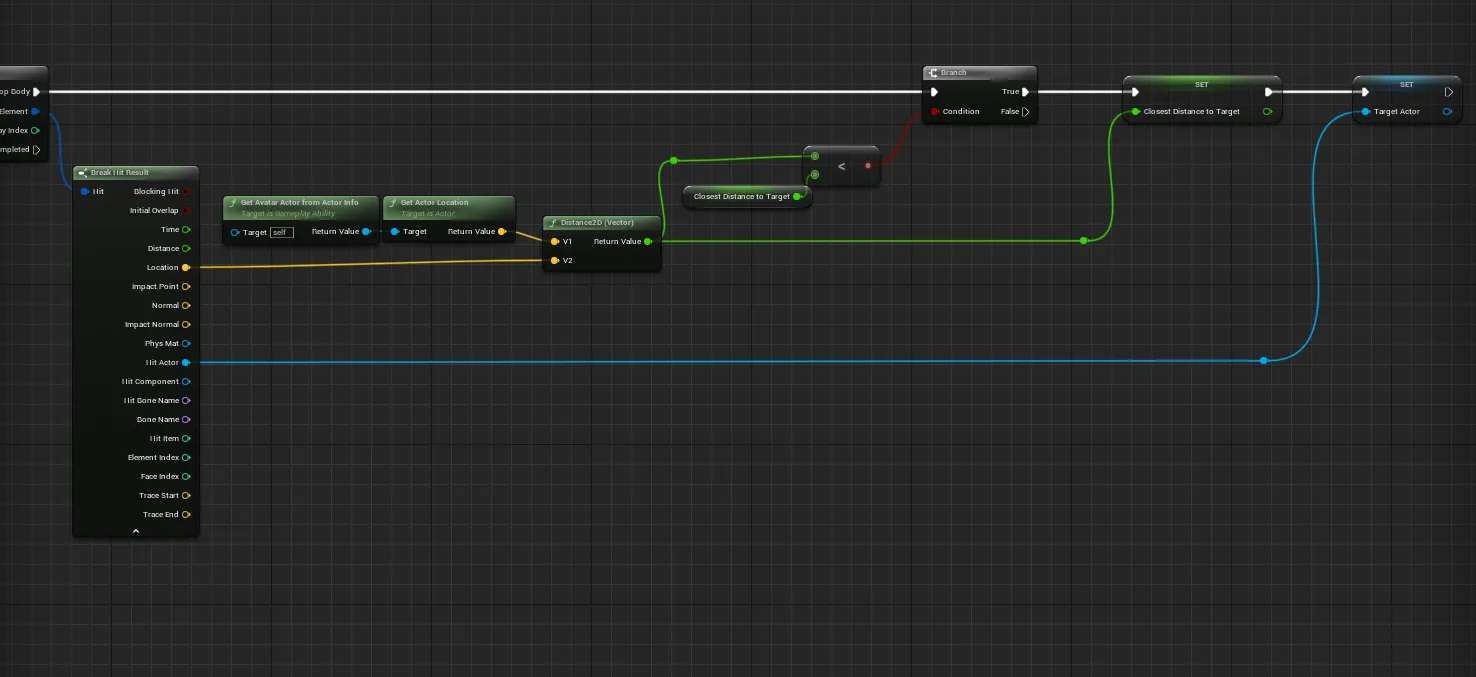
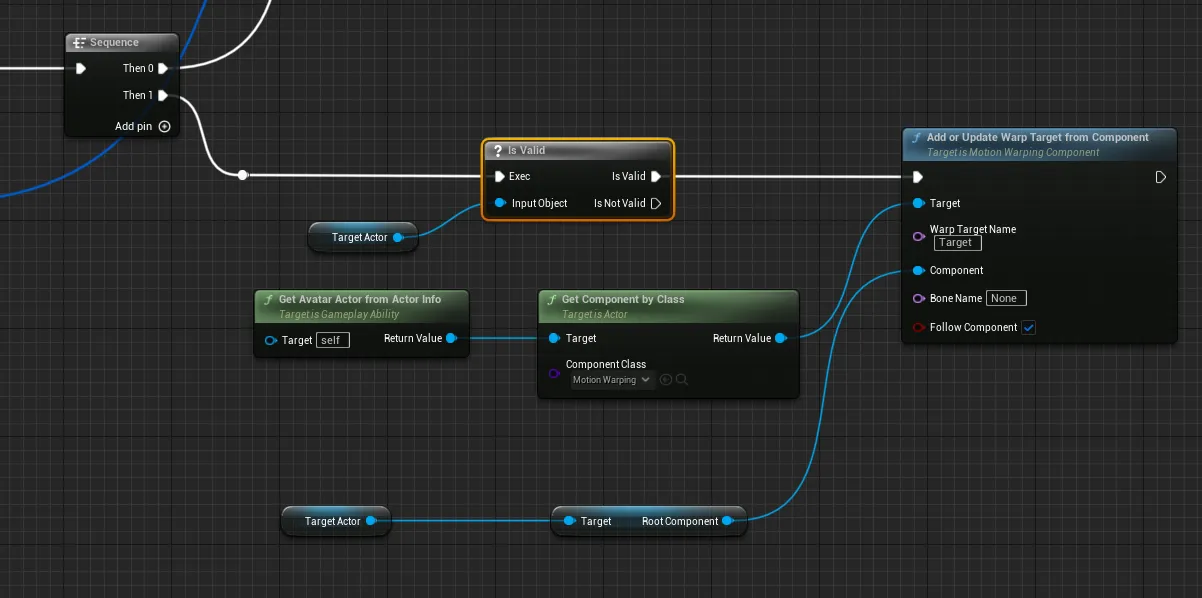
Setting the Motion Warp Target
Now that we have finished iterating we can add another step to the sequence.
In this case, if we actually found a valid actor, we will add a Warp Target.
For this we want to warp to component as we will use the Follow Component option to make it so if the target actor moves, the warp position will be updated.
You will see that we also need to pass in a Warp Target Name, you can put here whatever you want but remember it as we will use it soon. ( This allows you to have multiple targets working at the same time )
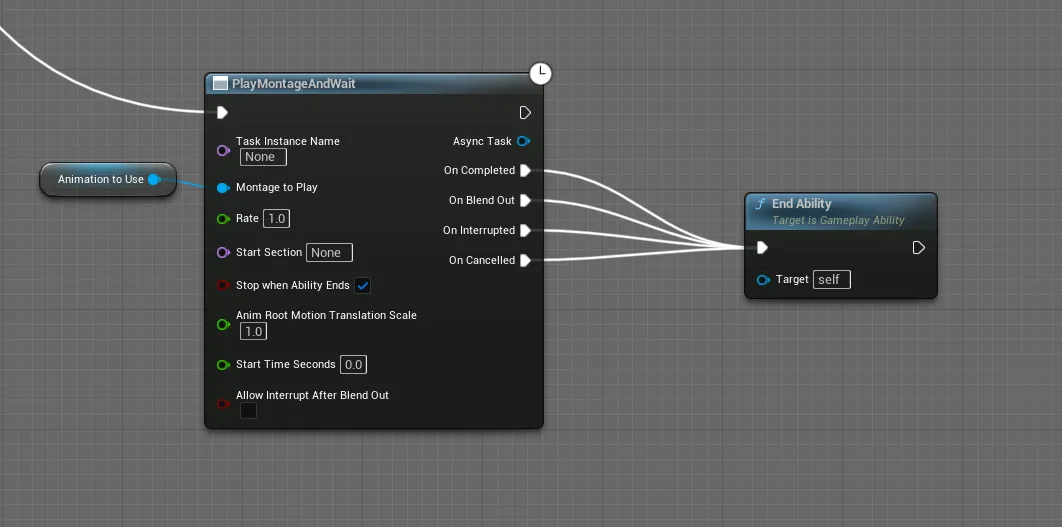
Play the montage
And finally, we play the animation montage. As this is a Gameplay Ability I’m using an Ability Task to do so, but it will work just fine with a normal Play Montage node.
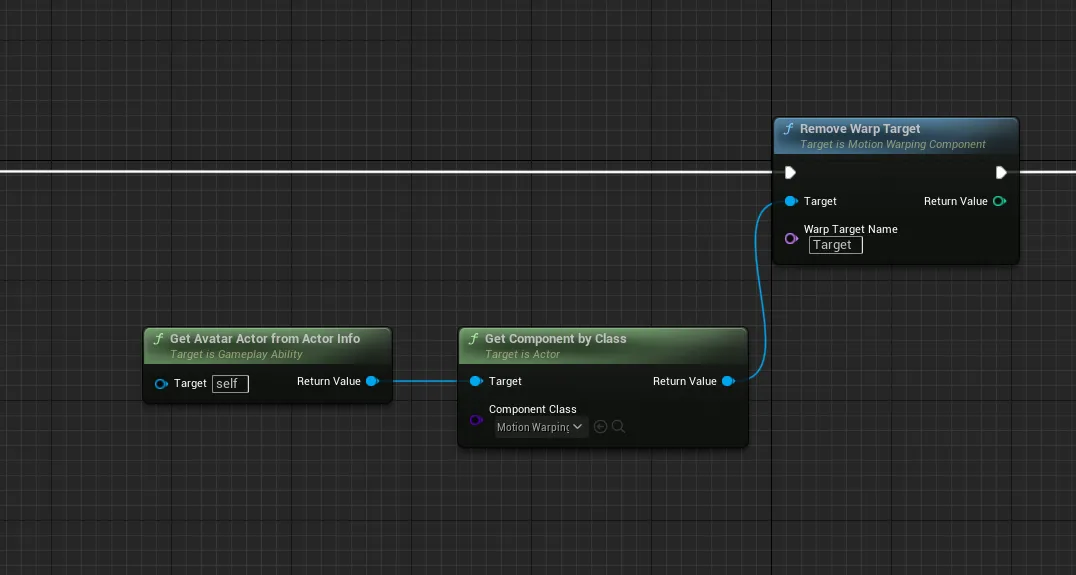
Extra step: Cleanup
One final thing worth noting. If we do not remove the target, as we have told the system to Follow Component, the motion warping will continue warping to that component on other notifies, so we need to clear it out.
You can do this after the montage is finished, or in my case I clear the Target once I receive the input to perform the attack, as maybe other systems might have also set that target.
And that is all we need regarding blueprint programming, now we are ready to configure things in the animations.
Setting up the animation for Motion Warping to work
Now that we have set up all our blueprint code, the only thing we need to edit is the animation itself.
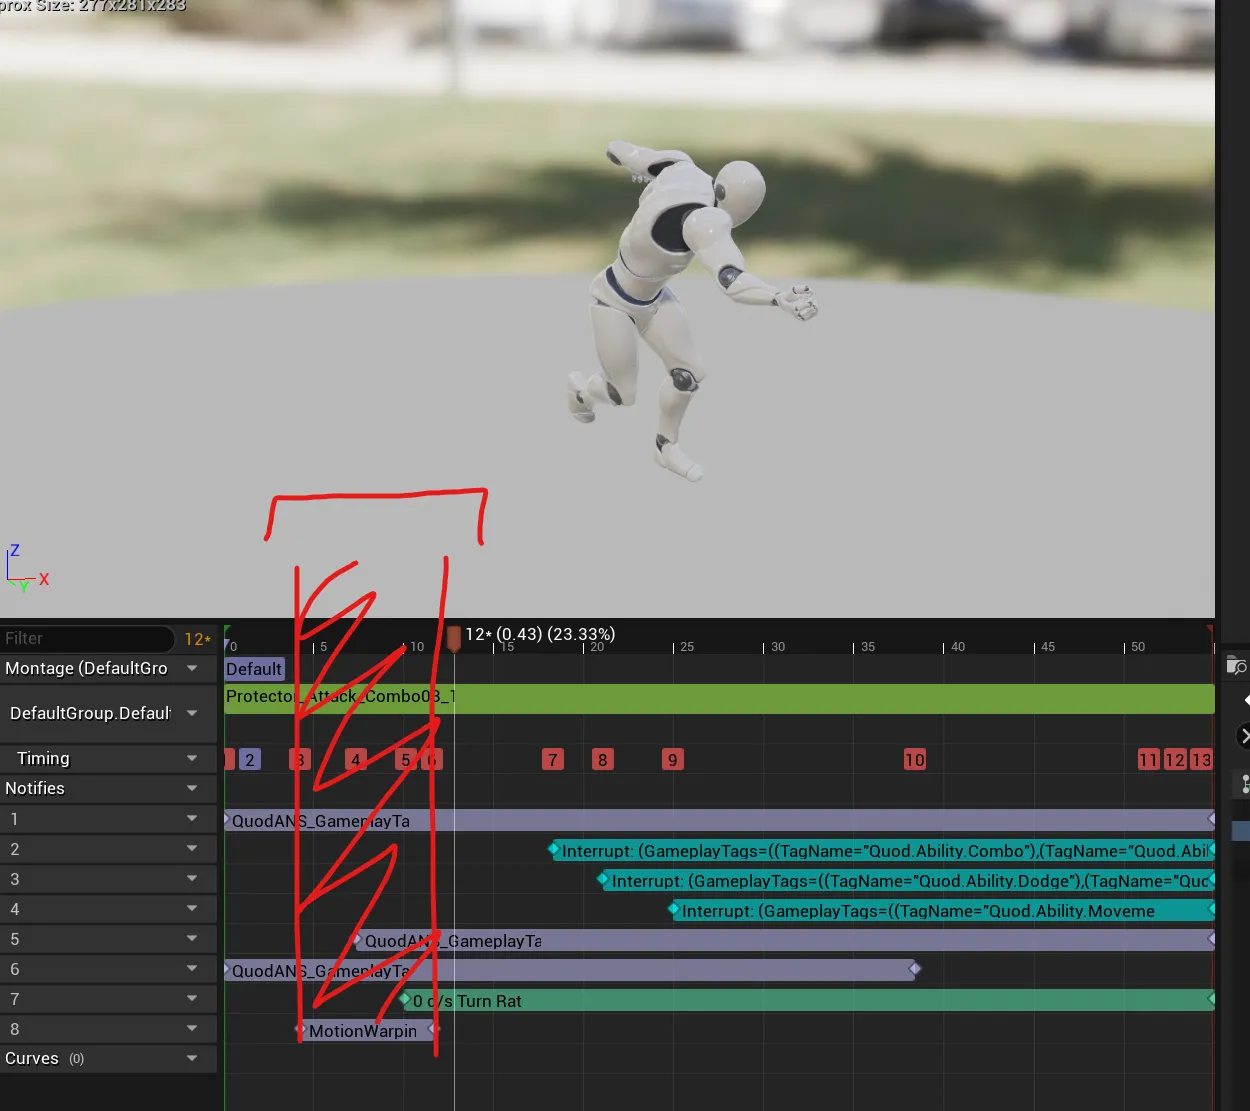
What we will do is that we will add a new Motion Warping Animation Notify State, you can do this by right-clicking on the anim notify panel ( 1. ) and selecting it.
Remember, it’s an Anim Notify State, as it has a duration, so if you are searching inside Anim Notifies it will not appear.
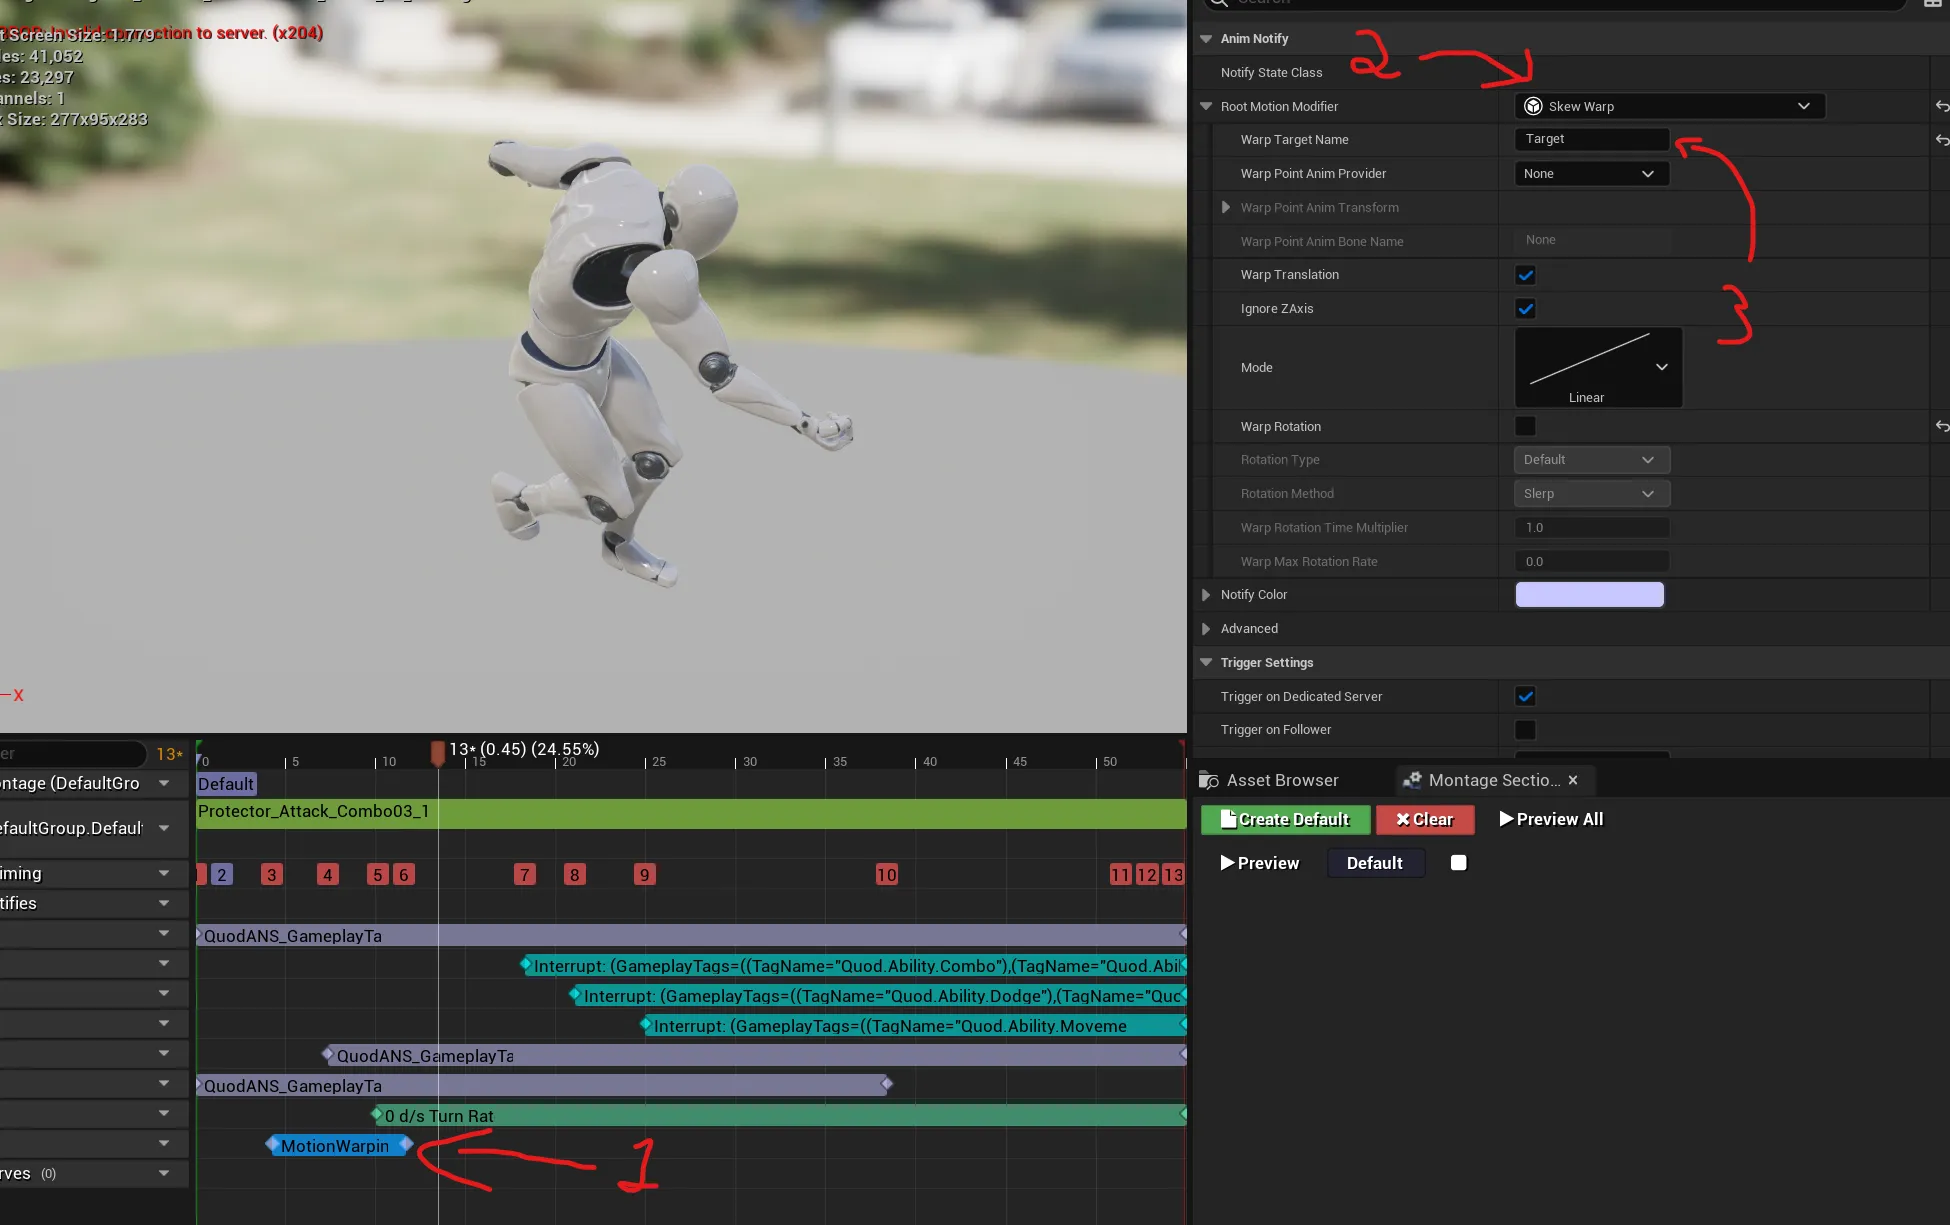
Once you have added it, select it and edit its properties on the detail panel on the right.
First we want to select Skew Warp. There are other types, like Scale Root Motion, but for now this one is the one we want to use.
And now it’s time to remember what name you gave to the Root Motion Target Name before, when you added it.
In my case I went by a simple name to remember and simply named it “Target”.
And that is it! If you perform the attack and there are other characters close to you you should warp towards them.
If that is not working continue to the next section for possible problems.
Help! It does not work! I’ve lost precious time of my life for nothing!
If things do not work properly it can be for a variety of reasons, such is the struggle of game development.
So let’s go through some common cases why the Motion Warping is not working for you.
Problems with Root Motion
Root Motion not enabled in the asset
The first important thing to know, is that motion warping works by modifying the root motion of your animation, if your animation does not have root motion active, it will not work.
If that is the case, go to the animation of your montage, and in its Asset Details panel enable this checkbox.
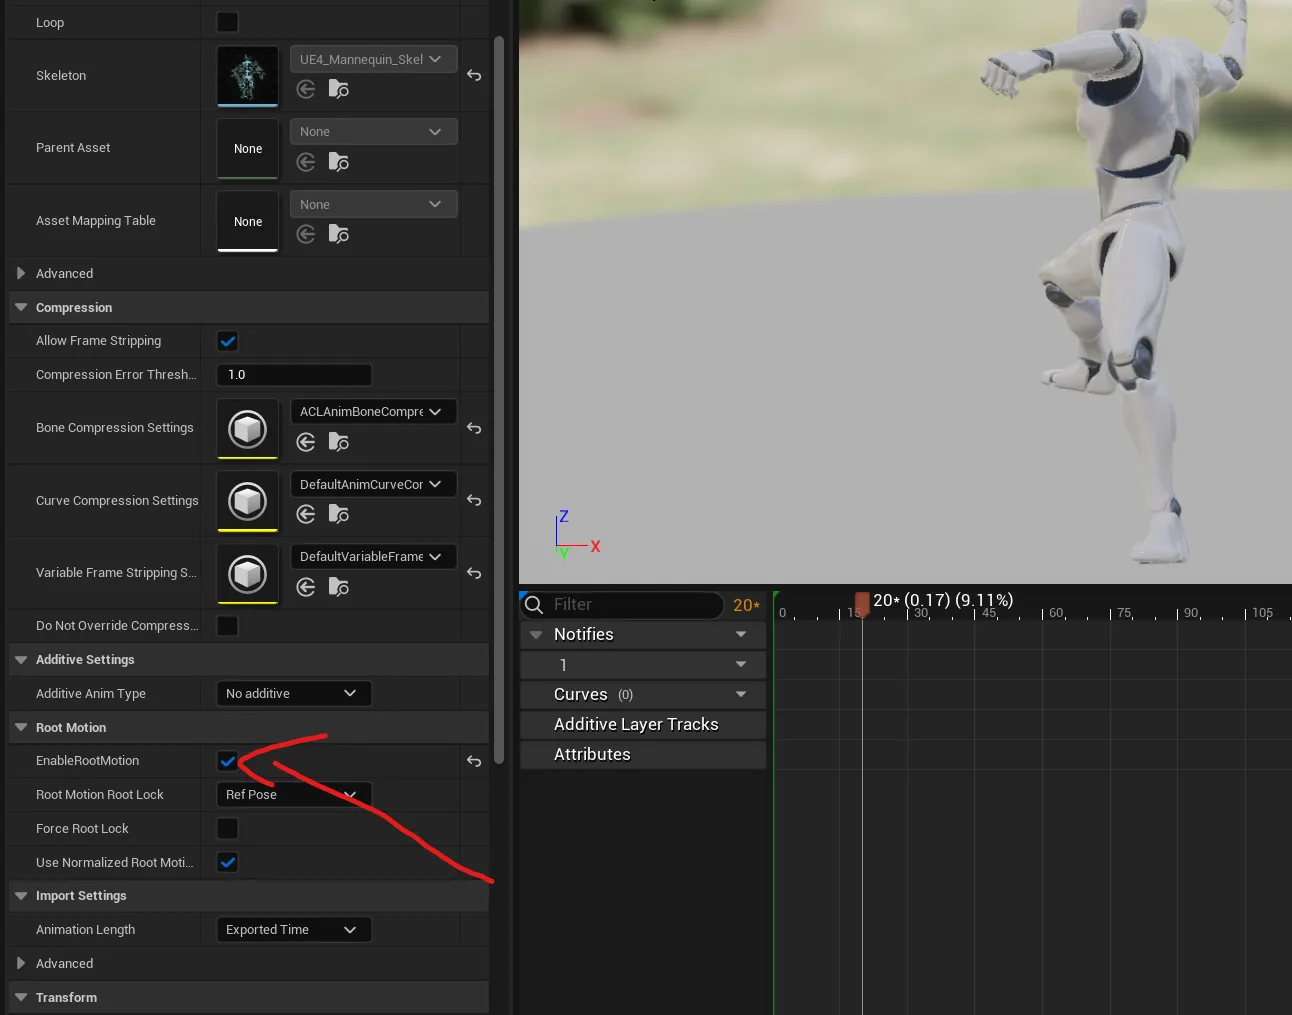
Animation has no root motion
If you have the checkbox but it still does not work it can be the case that the animation does not have root motion itself. So you can check this by selecting the root bone and enabling the Character -> Animation -> Loop And Reset Root Motion Mode. With the root bone selected confirm that it moves, if it does not it means that this animation has no root motion and you may need to animate it in your content creation package of choice. ( Or maybe in Unreal with it’s cool new animation features )
Anim Notify timing
It could be that the animation has root motion, but maybe it has no root motion during the time that the notify applies it, if that is the case you will need to move the notify or fix your animation to have root motion when you need it.
Other Problems
Missing Motion Warping Component
Check that your character actually has the Motion Warping component. If you have not added it, go to the beginning of the article to learn how to do it.
It still does not work
If after checking all this it still does not work, then don’t hesitate to reach out to me on Twitter so I can try to help you see what happens.
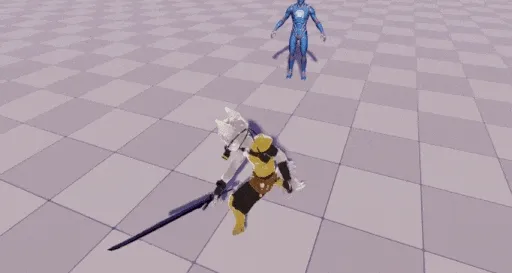
Here the player tracks the enemy, but the same setup works the other way around, for enemy attacks that track toward the player.
Recap
- Motion warping modifies root motion, so it only does anything if the montage’s animation actually has root motion during the window the notify covers. Most “it doesn’t work” cases are this.
- You set a named warp target in Blueprint ( from a location, or from a component with Follow Component so it tracks a moving target ), and the Motion Warping Anim Notify State on the montage reads that same name. The names have to match.
- Because Follow Component keeps updating the target, clear it when you’re done or later notifies will keep warping to it.
What this doesn’t cover
This is a local, single-player example. I didn’t get into replicating warp targets in a networked game, which is its own problem. The target-finding is deliberately simple too: a multi-sphere trace and a linear search for the closest Pawn. It works, but for a shipping game you’d want to handle the target dying or leaving range mid-attack, and probably weight by angle and not only distance.