
Unreal Engine is a powerful tool and one of its key strengths lies in its extensibility, facilitated by plugins.
From amplifying core functionalities to adding new features, plugins are game-changers.
This guide will show you how you can create your own custom Unreal Engine plugin.
For this guide we will use one plugin I'm building: Quod Custom Class Icons to illustrate the different steps.
Let's get to it!
Creating Your First Unreal Engine Plugin
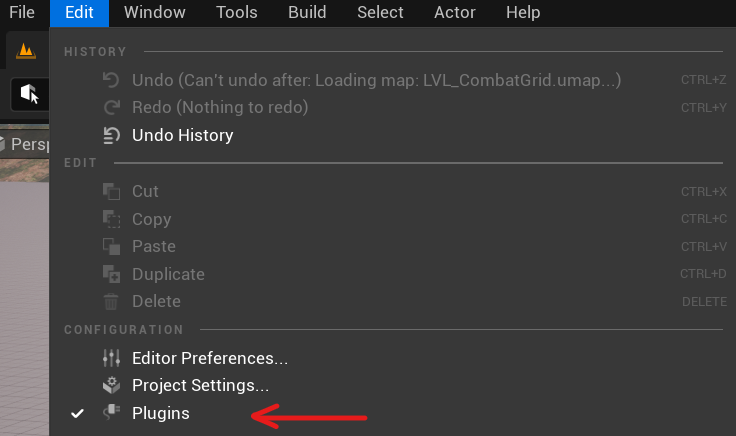
Let's dive into creating your first plugin. Begin by launching Unreal Engine and opening your project. Navigate to the 'Edit' menu and select 'Plugins'. Here, you'll see a '+ Add' button with the label. Click on it to create your plugin.

You'll need to specify the plugin type, which will depend on your needs. Editor plugins add tools to the editor, while Runtime plugins add features that will be available when the game runs, Blueprint Libraries allow the exposing C++ code to Blueprint and Game Features allow us to create Modular Gameplay Content isolated from our core content.
For our purposes, let's create a Blank Plugin, as we will configure everything ourselves.
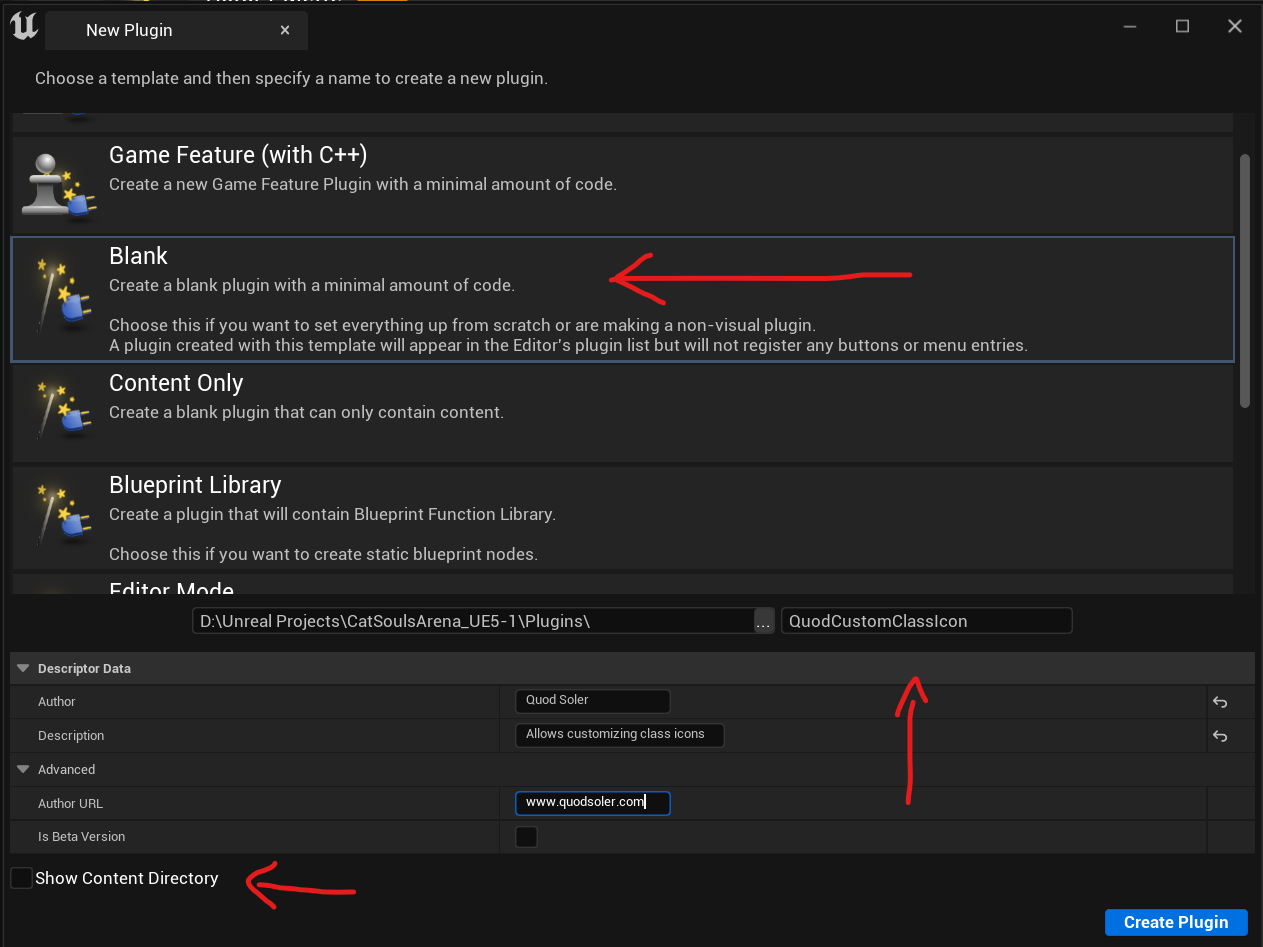
In the plugin wizard, enter a name and description for your plugin, and choose the 'Blank' template. After completing these steps, the wizard will create several files for you: source files (.cpp and .h files), resource files, and build scripts (.Build.cs files).
At this point, you can start coding your plugin.
Configuring the plugin modules
With our plugin created we will see that inside our project Plugins folder a new folder has appeared with the name of the plugin we have given in the previous step.

Let's now open the .uplugin file to configure the plugin. By default Unreal also creates a module for us named with the same name as the plugin. A plugin can have as many modules as you want but in this case one module is enought.
That being said we need to first configure that module to work as we want.
When you declare the module info that your plugin uses, you need to choose a type, most probably that will either be Runtime or Editor but here are all the different types in case you need them:
- Runtime: This module type loads for all targets with the exception of programs.
- RuntimeNoCommandlet: This one is quite similar to the Runtime type, but it also excludes the editor running commandlets.
- RuntimeAndProgram: This type loads for all targets, inclusive of supported programs.
- CookedOnly: As the name implies, this type loads only in cooked games.
- UncookedOnly: In contrast to CookedOnly, this type only loads in uncooked games.
- Developer: This type is deprecated due to ambiguities and is not recommended for use.
- DeveloperTool: Loads for any targets where the developer tools build is enabled.
- Editor: This module type is specific to the editor, loading only when the editor starts up.
- EditorNoCommandlet: Similar to the Editor type, but it doesn't load in commandlet mode.
- EditorAndProgram: This type is used specifically for editor and program targets.
- Program: Loads only for program targets.
- ServerOnly: This type loads for all targets excluding dedicated clients.
- ClientOnly: This type loads for all targets excluding dedicated servers.
- ClientOnlyNoCommandlet: This type loads in both the editor and client, but it doesn't load in commandlets.
By understanding these module types, you can make sure that your Unreal Engine module is being loaded in the right contexts and optimize its performance and utility.
Modules also have a loading phase, each representing a different point in the engine's startup process. Understanding these phases can be important in ensuring your module behaves correctly and is available when needed.
- EarliestPossible: This phase indicates that the module should be loaded as soon as possible, even before the engine is fully initialized. This is used for modules that need to read files, such as compression formats.
- PostConfigInit: At this phase, modules are loaded immediately after the configuration system has been initialized. This is necessary for modules that need to apply very low-level hooks.
- PostSplashScreen: Modules load during this phase right after the system splash screen has been rendered.
- PreEarlyLoadingScreen: These modules are loaded prior to the early loading screen. This phase is used for setting up manual loading screens and is used in chunk patching systems.
- PreLoadingScreen: At this point, modules that need to interact with the loading screen before it triggers are loaded.
- PreDefault: This phase happens right before the default loading phase.
- Default: During this phase, modules are loaded at the default loading point, which is during engine initialization and after game modules are loaded.
- PostDefault: This happens right after the default phase.
- PostEngineInit: Modules are loaded after the engine has been fully initialized.
- None: For this phase, the module will not be automatically loaded. This gives developers manual control over when and how the module is loaded.
I know that this has been quite an exhaustive list, but most provably you will only need Runtime/Editor types and Default/PostEngineInit phases.
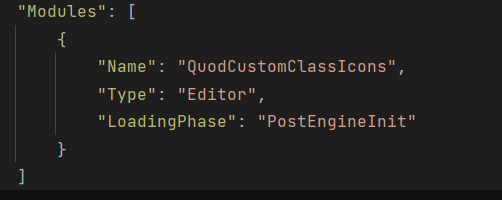
In the case of the QuodCustomClassIcons module of the plugin, I need and Editor type ( as this should only be available while using the Editor ) and a PostEngineInitPhase ( as I need to be able to load assets ). The result is the following:
Writing the Plugin Code
Now with our plugin created and configured we can finally write our plugin code. These will go inside our modules like we do for our Game modules and in the case of plugins it's best-practice to separate the files into the Public/Private folder structure so we only publicly export what we desire.
We can start adding new classes that projects that import our plugin will use or, like in the case of the Quod Custom Class Icons, modify the StartupModule function of our module to perform logic when the module is loaded.

In the case of my old gameplay framework for instance the module had more code that it provided for projects to use:

So as you can se we can use plugins to extend any kind of functionality we want and separate our code into modular pieces that fit together.
Extra: Packaging your plugin for the Unreal Marketplace
I was going to write a post on how to package your plugin for publishing on the marketplace, but I have found out that there is a neat plugin that already handles that out for you and it's free.
It's this one:
https://www.unrealengine.com/marketplace/en-US/product/pluginbuilder
It creates a new cool menu that allows you to configure everything in a super easy way, from Unreal Version, which plugin you want to package, for which platform... everything you need.
It might also be a good example on how to extend the editor with a plugin, so you can look at its source code for that.
Conclusion
I hope that has given you a better understanding on how to create your own plugins. Plugins are super useful and make code sharing and collaboration easier.
So go, create awesome plugins that will change the world!
Or at least your game world!


